")
Data Validation in Excel is a very powerful tool to make data entry organized, keep data error free and easy to analyze. You must have seen cases in Excel where people enter incorrect data by mistake. For e.g., writing text where a number is supposed to be entered, or typos like ‘Jhon’ in place of ‘John’.
This leads to confusion and errors while analyzing this data using formulas, pivot tables or charts. Thus, applying data validation in Excel is extremely important when multiple people work on a spreadsheet. With data validation, we can control what other people can and can not type in certain columns / rows.
Applying data validation will make your Excel much more free from errors and clean, whether you are creating a team tracker, managing a dataset, or creating a form.
In this beginner’s guide, we will explore the following:
-
What is Data Validation?
-
Why is it important?
-
How to apply different types of data validation (step-by-step)
-
Practical examples for everyday Excel tasks
-
Common mistakes to avoid
-
Practice questions to test your learning
🔍 What is Data Validation in Excel?
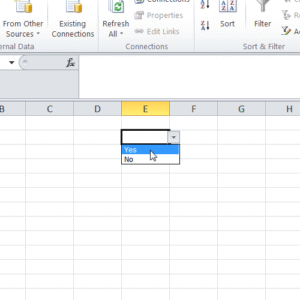
As discussed above, data validation in Excel is a built in feature. With it, we can control what users can and can not enter into our sheet. For e.g., we can apply a restriction on a column that only numerical values can be entered. Or we can define for a column that only ‘Yes’ or ‘No’ can be selected from the drop-down button.
Here is a list of everything we can do with data validation in Excel:
-
Ensure that only whole numbers or decimals are entered
-
Make drop-down lists to select the value from
-
Enforce that entries belong to a certain date or time range
-
Stop duplicate values from being entered
-
Display custom error or help messages
We can use one or more of these practices to reduce errors, maintain consistency, and ensure that we have high-quality data in our Excel sheets.
✅ How to Apply Data Validation in Excel (Step-by-Step)
Ok, let’s begin with the basics first. Follow along these steps –
Step 1: Select the Cell(s)
Click and shift+arrow key / drag to select the range of cells where you want to apply data validation.
Step 2: Open the Data Validation Menu
-
Go to the Data tab on the Ribbon
-
Then click on Data Validation in the Data Tools group
-
Now choose Data Validation from the drop-down
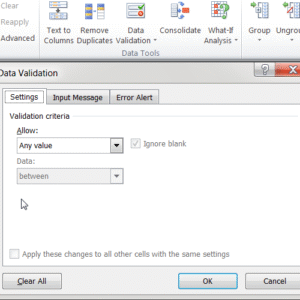
You will thus see a dialog box with three tabs: Settings, Input Message, and Error Alert. Interface may vary based on the Excel version you are using.
📘 Common Types of Data Validation (with Examples)
1. Whole Numbers Only
We can choose this option to allow only whole numbers like 10,20,25 etc to be entered in the sheet.
How to do it:
-
In the data validation Settings tab, choose:
-
Allow: Whole number
-
Data: between, not between, equal to, not equal to, greater than or less than as per the requirement. For e.g., if we want only the numbers between 10 to 100 to be entered in the sheet, we can select ‘between’ here and enter 10 in minimum field and 100 in maximum. Now if anyone enters 105 or 9, they will get the error message. Similarly, if we select ‘greater than’ and enter 20 in the ‘minimum’, entries like 12, 13 etc will get an error.

-
✅ Now we have ensured that only the numbers that meet our restrictions can be entered in the sheet. Anything else will trigger an error.
2. Decimal Numbers
This restriction allows values like 1.5, 3.14, or 99.9 within a range.
Example:
Restrict discount rates between 0 and 0.5 (i.e., 0% to 50%).
Settings:
-
Allow: Decimal
-
Data: between
-
Minimum: 0
-
Maximum: 0.5
Other options like greater than, less than etc are also available here.
3. Date Range
This will ensure that users can enter dates as per the pre-defined condition. For e.g., dates after 01 Feb 2023, or dates before 01 March 2019.
Example:
Make sure that users can enter vacation leave dates only between January 1 and December 31, 2025.
Settings:
-
Allow: Date
-
Data: between
-
Start Date: 01/01/2025
-
End Date: 12/31/2025
4. Time Validation
Similar to dates, this validation technique restricts input to specific working hours.
Example:
Make sure that only the times between 09:00 AM and 05:00 PM are entered in the sheet.
Settings:
-
Allow: Time
-
Data: between
-
Start time: 09:00 AM
-
End time: 05:00 PM
5. Text Length
Useful when you need short inputs, like codes or passwords.
Example:
Ensure that users can enter text entries of exactly 5 characters.
Settings:
-
Allow: Text length
-
Data: equal to
-
Length: 5
6. Dropdown Lists (List Validation)
This is the most used feature and perhaps the most important one too. Suppose we float the sheet to employees and ask them to enter their department name against their names. Now someone in Marketing will write ‘Marketing’, another employee may write ‘Marketing team’ / ‘Marketing department’ etc. There can be n number of variations for the same thing. Hence we give a drop-down list in the cell.
Example:
Create a list of allowed departments: Marketing, Sales, HR, IT.
Steps:
-
Select cells (e.g., A2:A10)
-
Go to Data Validation
-
Allow: List
-
Source:
Marketing, Sales, HR, IT(just write the text and separate them with a comma. No need for ‘___’ or space.
📝 Tip: You can also reference a list of values from a range like =Sheet2!A1:A4.
7. Custom Validation Using Formulas
This is for advanced users for more control.
Example:
Allow only values greater than 0 and less than 1000.
Settings:
-
Allow: Custom
-
Formula:
=AND(A1>0, A1<1000)
💬 Input Message and Error Alert
We can use ‘Input Message’ and ‘Error Alert’ to guide users with friendly popups.
Input Message:
This appears when you enter a value in the cell which is not meeting the data validation rule.
Example:
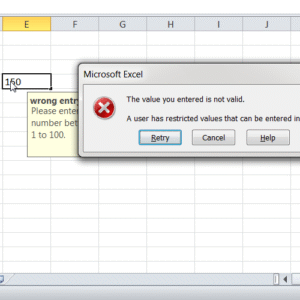
“Enter a number between 1 and 100.” Now if we enter 150 in this cell, we get the Input message which we can define as per the screenshot. If we ignore this input message and go ahead and hit enter, we will get the following pop up –

Error Alert:
This appears when invalid data is entered.
Types of Alerts:
-
Stop – If we select this option, users will not be able to enter values not meeting the validation rule.
-
Warning – This option will warn the user about incorrect entry but allows input.
-
Information – Just informs, doesn’t block.
⚠️ Common Mistakes to Avoid
-
Forgetting to apply validation to the whole range.
– We should make sure to select all relevant cells before applying validation rules. -
Not locking validated cells.
– Users may inadvertently remove validation. Hence, combine validation with sheet protection if you don’t want users to remove validation. -
Hard-coding lists into multiple cells.
– We should use named ranges to make drop-downs dynamic. -
Over complicating custom formulas.
– Custom formulas, if complicated and dragged to hundreds of cells can make the sheet heavy. Hence, keep it simple and test on a few cells first.
💡 Real-Life Use Cases
-
Employee Forms
-
Drop-down for departments
-
Allow only current year to be entered in joining date column
-
-
Sales Entry Sheet
-
Allow only numbers between 0 and 10,000
-
Validate discount percentage to be under 50%
-
-
Survey Response Collection
-
Gender drop-down: Male, Female, Other
-
Restrict age between 18 and 60
-
📝 Practice Questions
Now let’s try these out in a new Excel sheet:
Q1. I want users to enter only whole numbers between 10 and 500. Set-up a data validation rule for that.
Q2. We have only four fruits – Apple, Banana, Orange, Mango. Create a drop-down list for these to avoid typos / wrong entries.
Q3. Restrict entries to dates between July 1 and December 31 of the current year.
Q4. Allow only entries that are less than or equal to the value in cell B1.
Q5. Create a custom validation that only allows values that are even numbers.
Hint for Q5: Use this formula: =MOD(A1,2)=0
🔚 Conclusion
It may appear that data validation in Excel is a technical task. However, once we practice enough, it becomes one of the most powerful feature in Excel. With data validation, we save lot of time in cleaning the errors and correcting the typos later as the entered data is already correct, consistent, and clean.
Whether you’re managing reports, forms, or budgets, using data validation will make your Excel files more professional and error-proof.
📥 Want More Excel Practice?
👉 Bookmark codeandexcel.com for easy guides, free practice files, and Excel tricks every week!
Have questions or want more advanced data validation examples? Drop a comment below!
Also check our other articles on –